Basic setup Quick Guide
This Quick guide is an easy way to develop a standard setup procedure guaranteeing accurate settings and a successful experience with your r/c aerobatics 3d model airplane.
Basic Setup
- Servo Reversing. Just check the direction of movement, and reverse accordingly.
- Check that all servo arms are centered to 90 degrees.
- Sub trimming: Always sub trim to 90 degrees and mechanically center the flight control surface the best you can. Then sub trim to be perfectly centered.
- Travel Adjust or endpoint adjustments
- Each Flight control must be set to its physical limits. This means as far as it will go, but no farther than it has to. You set this by selecting the servo, fully deflect the surface with the transmitter, then increase (or occasionally decrease) the percentage to where the flight surface will not travel any further. Then simply back off a click or two and you are done. Then, simply deflect it in the opposite direction and repeat the process.
- Rates and Exponential Settings.
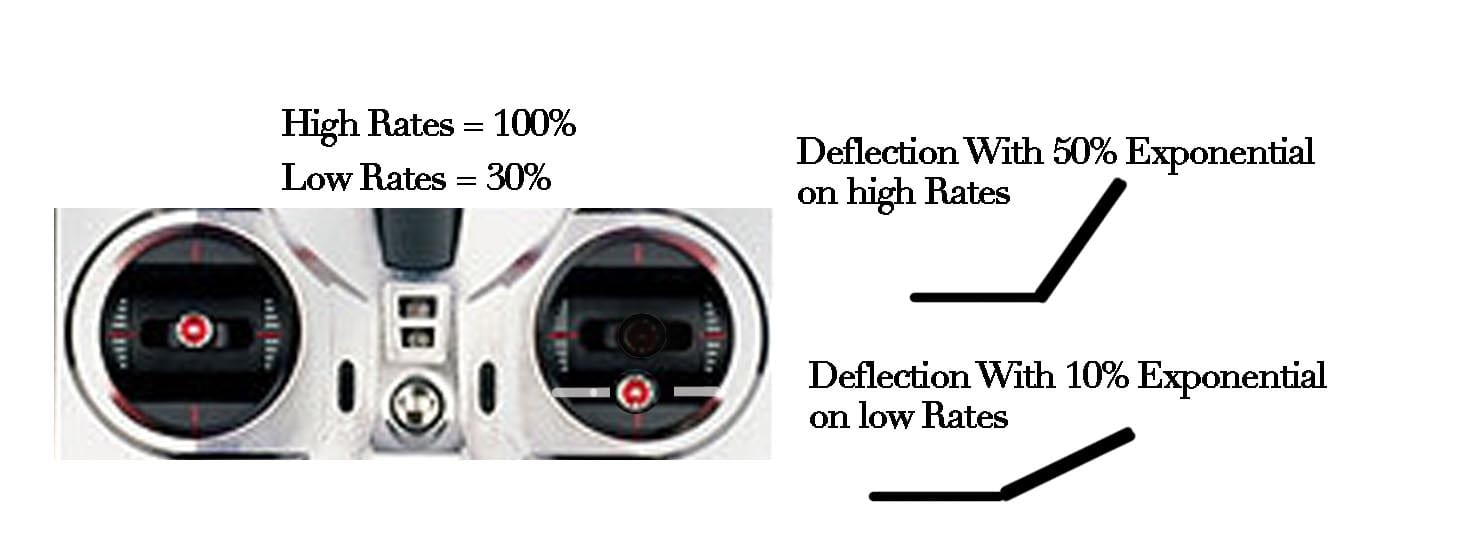
- The rates will accurately reflect the percentage of the full range of deflection after the travel adjust settings are correct. We must set at least 2 rates. High rates are full deflection (with more expo). And Low rates are usually in the 30% to 50% with little expo. I always take off and land on high rates in case of flight failures or in case I should need all I can get when flying slow.
- Exponential: With exponential you can make it so the stick movement at the center deflects very little and feel soft like low rates, and at the last part of the stick travel it deflects the surface dramatically. My personal settings are set to where I can hardly tell which rate I am on until I get the stick toward the end where the difference is dramatic. I use a little trick where I put the stick at one third and set to where when I switch between rates the surface hardly changes. Obviously at the end points it is an enormous difference.
My personal expo settings for low rates is in the 20% range for an aerobatic plane and half that for a war bird, and in the 60% to 70% range for high rates for 3d and near 40% for warbirds. Again, this is highly dependent on the plane and this is a general guideline only, and is my personal preference.
Note: JR exponential is set to + and Futaba is -. i.e. +60% or Futaba -60% to achieve the same result. Setting Futaba radio to a plus number will result in a dangerously sensitive condition and vise versa for JR
Basic Programming and setup Detailed Instructions
This simple guide is all about making certain your model airplane flies to its potential, and any bad habits it might have will only be those associated with the airframe itself. If any of the items listed are not set to the standard below, flight performance suffers, the only question is to what degree your inaccurate settings will adversely affect the plane and its flight performance.
Basic Setup
- Servo Reversing is obvious, but necessary as a first step. Just check the direction of movement, and reverse accordingly.
- Check that all servo arms are centered to 90 degrees. If not, geometry will not be correct. Dual elevators will not move together, and throws will be greater on one side than the other. This creates inconsistent and unwanted flight characteristics.
- Sub trimming: It is important the you start the sub trimming with the servo at 90 degrees. Sometimes it is not possible with your particular servo arm, but the teeth on the servo are an odd number. This means when the servo is centered, a particular servo arm will only be at 90 degrees on one side or the other. Manufacturers usually provide one for each side. Choose the one for the side the servo arm is extending from. If no choice, it is simple to sub trim it out. Always sub trim to 90 degrees and mechanically center the flight control surface the best you can. Then sub trim to be perfectly centered.
TIP: Always set up ailerons on 2 servos when possible. Generally the flaperon setting will do the trick for most radios. Also, most advanced radios have dual surface settings as well, so dual elevators, flaps and/or ailerons will allow full individual control allowing proper geometry and precise equal movement. It also allows the trim and mixing functions to work properly.
Travel Adjust or endpoint adjustments
- Servo arm and control horn hole choices are often as vital as the servo setup itself. Simplified, the length of the servo arm controls the distance the flight surface travels. A two inch servo arm will allow for more travel than a one inch arm. The opposite is true at the control horn. There are often multiple holes on the control horn or various lengths. The longer the control horn is, the shorter the travel. The key here is to balance the two control linkages. It is always best not to use extremes, and use the choices that allow maximum travel with little to spare. As a rule, I use a servo arm and control horn setting that gets me to full deflection at 125% travel adjust setting or in that vicinity. If you are too short, you cannot get full performance, and if your servo arm is too long, it reaches full deflection under 100% or travel adjust setting, you will lose power and resolution because you are deflecting very far with little servo rotation. This causes bad centering, hyper sensitivity and surface blowback. Blowback is when your servo is not able to maintain deflection because of the air pressure resistance in flight.
- Each Flight control must be set to its physical limits. This means as far as it will go, but no farther than it has to. You set this by selecting the servo, fully deflect the surface with the transmitter, then increase (or occasionally decrease) the percentage to where the flight surface will not travel any further. Then simply back off a click or two and you are done. Then, simply deflect it in the opposite direction and repeat the process. This must always be done for Rudder, ailerons, flaps and elevators. Remember, the percentage in the display has no relevance to your model. Only the servo’s travel. This means 100% on your display might only be 80% of the available throw, or might be 120%. One number has nothing to do with the other. This is done for two very profound reasons. The first, is that this will allow for the full travel intended by the manufacturer to control your model properly. A 3d model might reach 45 degrees max, and a warbird might only be 20 degrees. If you deflect fully, 100% on your dual rates controls will always represent 100% of the flight surfaces travel. Second, this will keep you from overdriving your servos, and/or losing resolution in the sticks. If you reach full deflection ¾ of the way of your stick movement, the model will be extremely sensitive and you will not have full resolution on your stick movement. Conversely, your exponential settings will not be accurate either.
Rates and Exponential Settings.
- The rates will accurately reflect the percentage of the full range of deflection after the travel adjust settings are correct. We must set at least 2 rates. I personally use 3 flight modes (rates) I use a low rate for precision or high speed flying, a mid rate (I call a snap rate) which is low rates with a slightly higher rudder and elevator, and a high aileron rate. This is for snap rolls and quick rolling sequences. These low rates can be as low as 20% or relatively high. I usually pull a full deflection loop and want the plane to be able to do a reasonably tight loop. It needs to be able to do a hard turn, but not too tight. I use the same rate or similar on my mids. I just make certain I can make the snap rolls look good, so sometimes it requires a bit more than low rates. For the rudder, I make certain I have enough to hold the nose up on a mid speed knife edge. This is all my personal taste, and may not match yours. Set to your flying style. High rates are full deflection. I always take off and land on high rates in case of flight failures or in case I should need all I can get when slow. It has saved a plane many times. Keep in mind we are going to set the exponential to make the high rates feel nearly the same as low rates for the first 30 percent of your stick center.
- Exponential is easily explained and easy to use. No expo means every 20% of stick travel moves the surface 20% of its travel. With exponential you can make it so the stick movement at the center deflects very little and feel soft like low rates, and at the last part of the stick travel it deflects the surface dramatically. For example, 50% expo will deflect the surface 25% on the first half and 75% on the second half of the stick input. (Fig 1 and 2) This is an example and not entirely accurate, but illustrates the application. Conversely, by using enough expo, you can make the plane feel virtually identical (FIG 3) on low and high rates when the stick is moved halfway in its travel. My personal settings are set to where I can hardly tell which rate I am on until I get the stick toward the end where the difference is dramatic. I use a little trick where I put the stick at one third and set to where when I switch between rates the surface hardly changes. Obviously at the end points it is an enormous difference.
My personal expo settings for low rates is in the 20% range for an aerobatic plane and half that for a war bird, and in the 60% to 70% range for high rates for 3d and near 40% for warbirds. Again, this is highly dependent on the plane and this is a general guideline only, and is my personal preference.
Note: JR exponential is set to + and Futaba is -. i.e. +60% or Futaba -60% to achieve the same result. Setting Futaba radio to a plus number will result in a dangerously sensitive condition and vise versa for JR.
TIP: Remember, especially on a 3d setup, full rates are only used when flying very slow and near stall speed or when doing violent tumbling. When flying straight lines or general aerobatic flight, stick movements stay close to the center. As long as the high rates feel good near the center, take off, landing and general flying can be done on high rates. People often fear the high rates because of extra sensitivity. But it is the wrong expo settings causing the problem. Don’t be afraid of high rates, they are your friend if there is ever a problem.
— Michael Wargo
FIG 1: Note that on 25% deflection on high rates with 50% expo, surface moves half as much as with no expo.
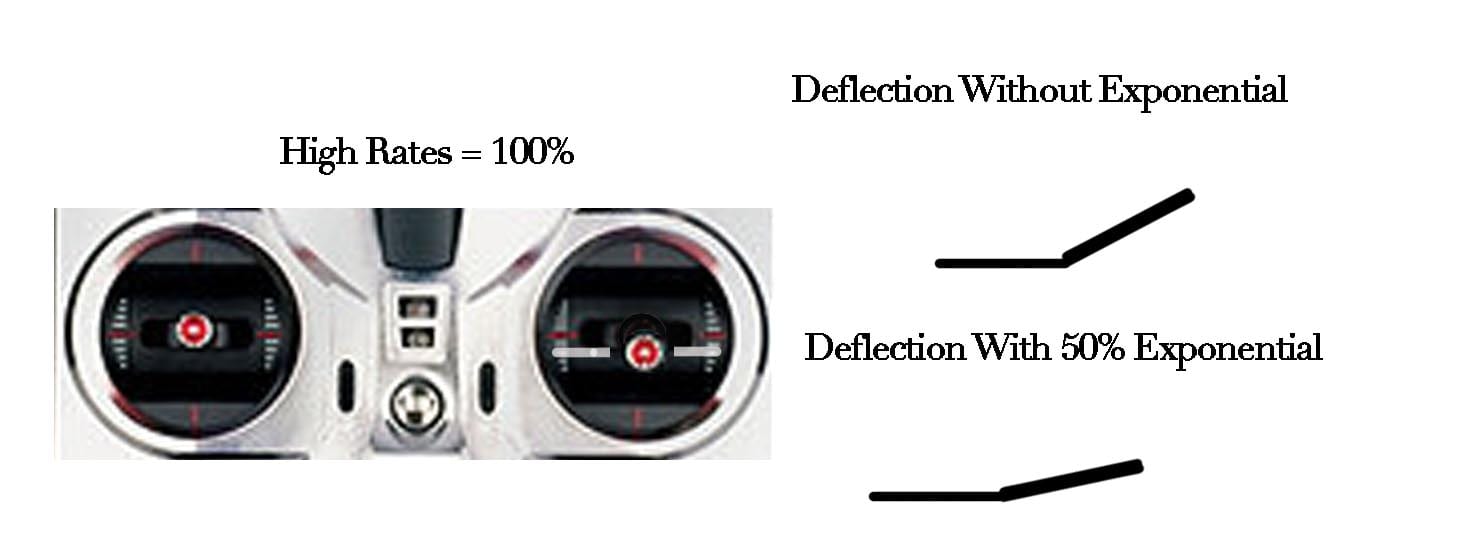
Fig 2: Note with and without expo end points are the same
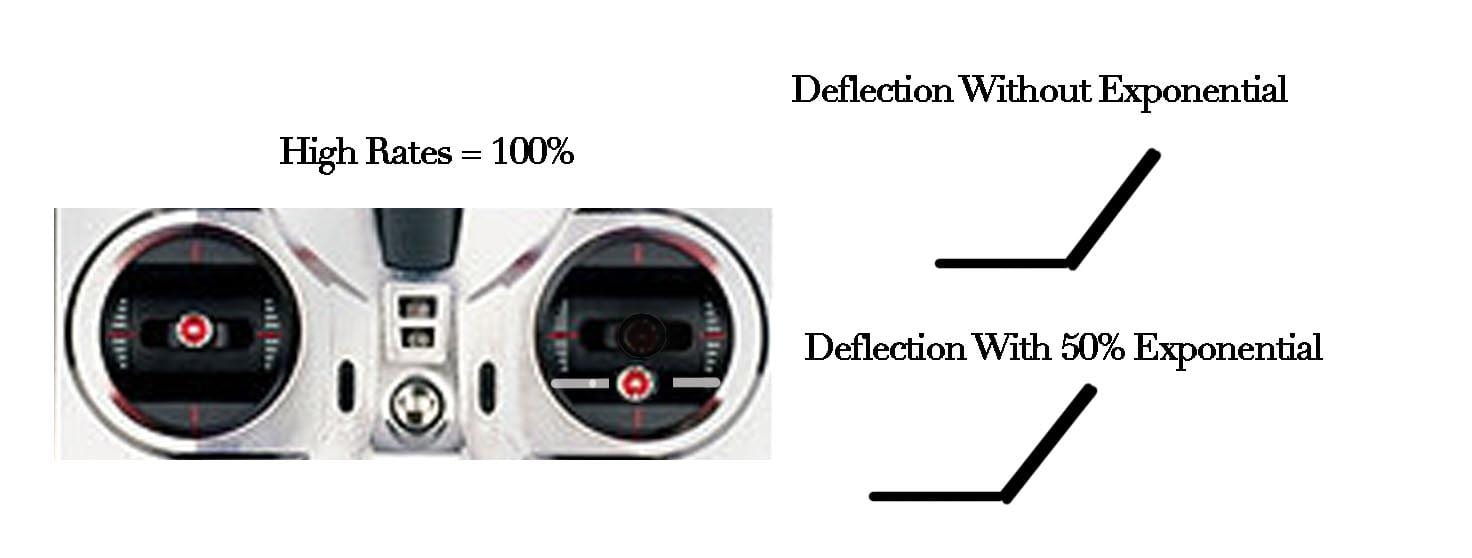
Fig 3 and 4: Note surface travel is the same with low and high rates near center. Endpoints are similar here, whereas high rates reach full deflection at end.
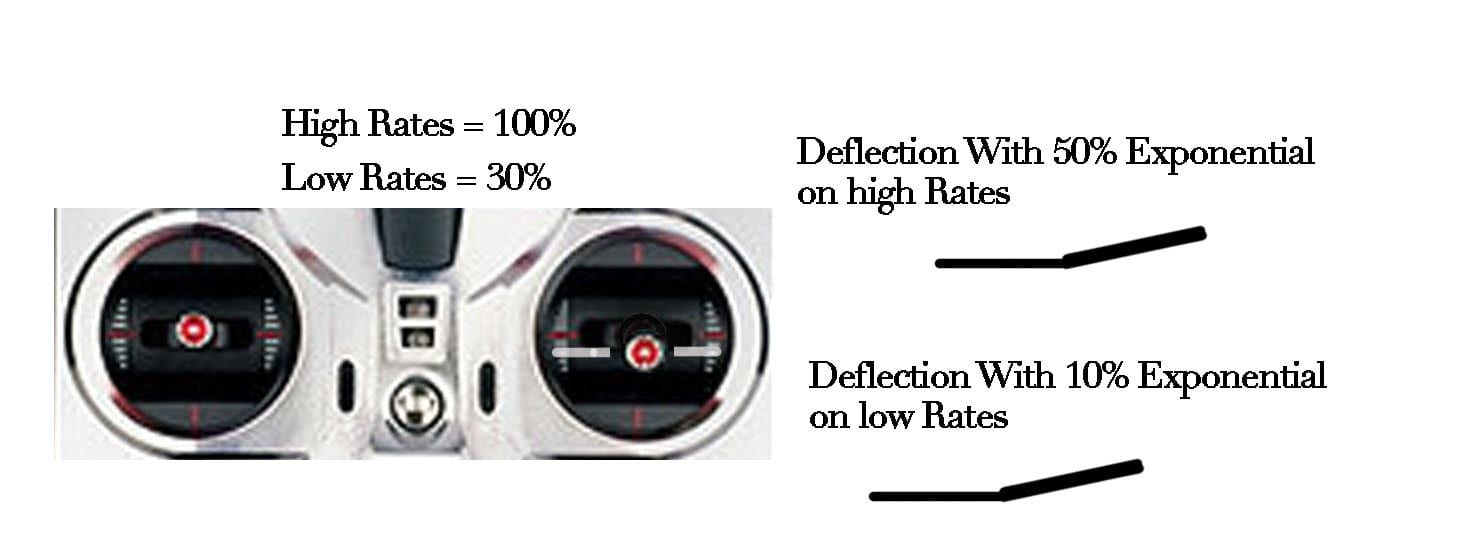
Fig 4: Full deflection